Cutting your own fade sounds intimidating, and honestly, your first attempt will not look like a barbershop cut. But the low taper fade is the most forgiving fade to learn, because the transition is small and sits low on the head. With the right tools, a slow approach and a clear sequence, you can get a clean, wearable result, and you will get better every time.
This guide is written for someone cutting their own hair or a friend's hair for the first time. If you are cutting a child's hair, the same steps apply, but use longer guards (see our low taper fade for boys guide).
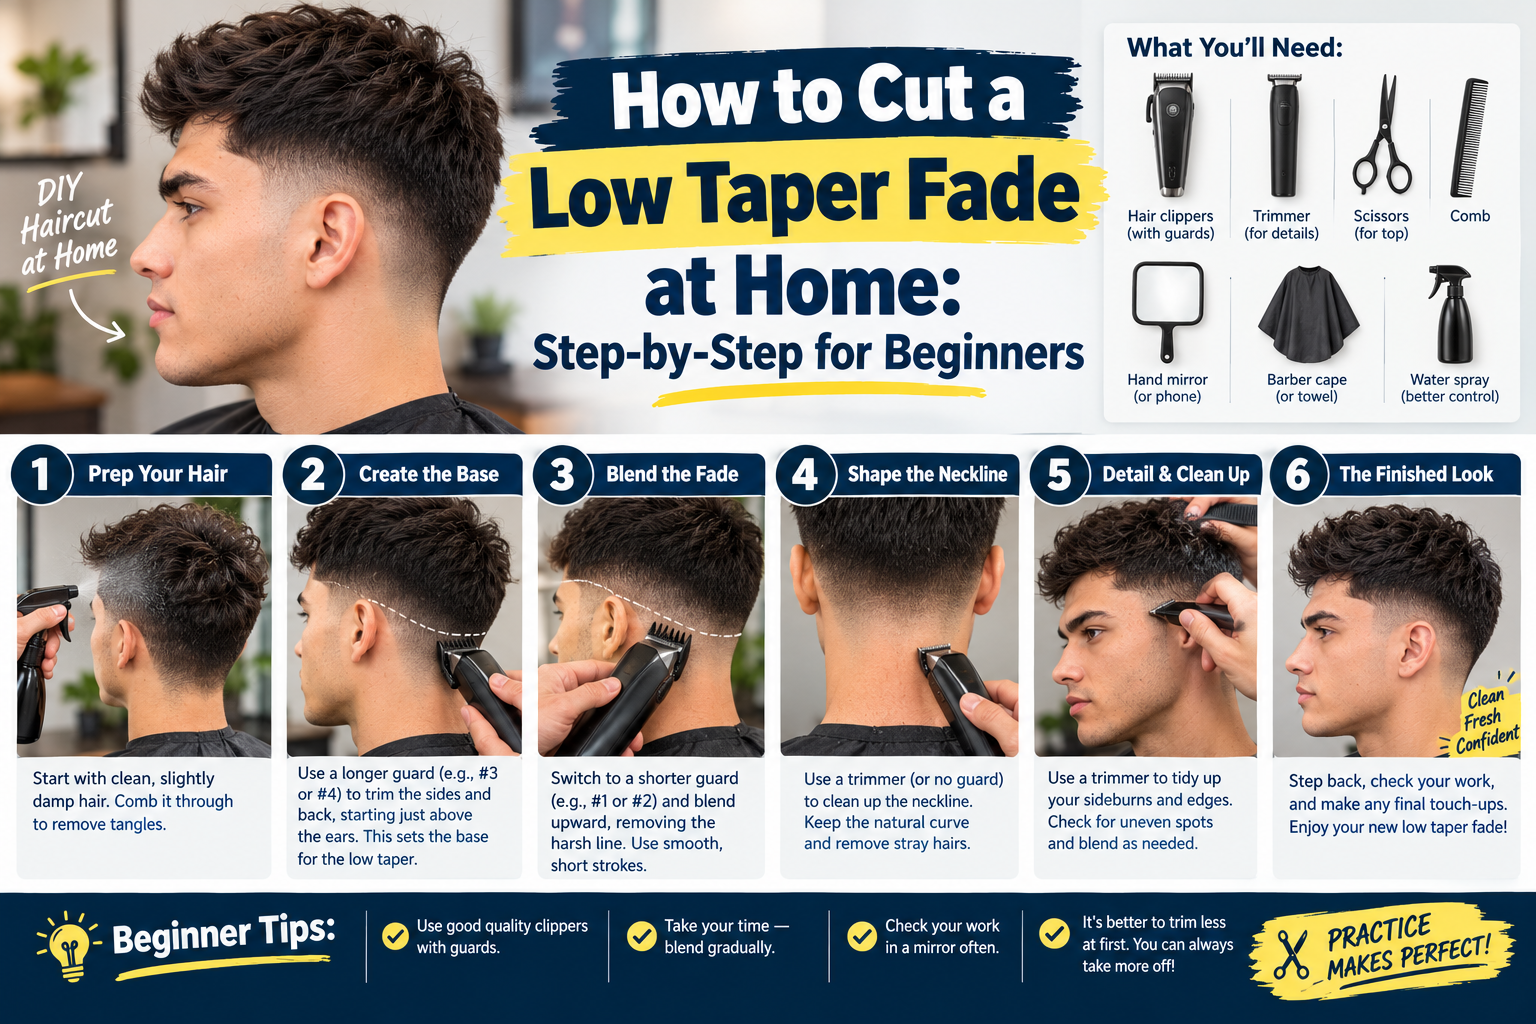
What You Need
| Tool | Why it matters |
|---|---|
| Clippers with an adjustable lever | The lever lets you create in-between lengths for smoother blending |
| A full set of guards (#0.5 to #4 at minimum) | Each guard is a step in the fade |
| A trimmer (outliner) | For the very bottom edge, sideburns and neckline |
| Two mirrors, or a three-way mirror | You must be able to see the back |
| A comb and a hair clip | To separate the top from the sides |
| A neck duster or soft brush | To clear hair so you can see the blend |
| Good lighting | Shadows hide uneven lines |
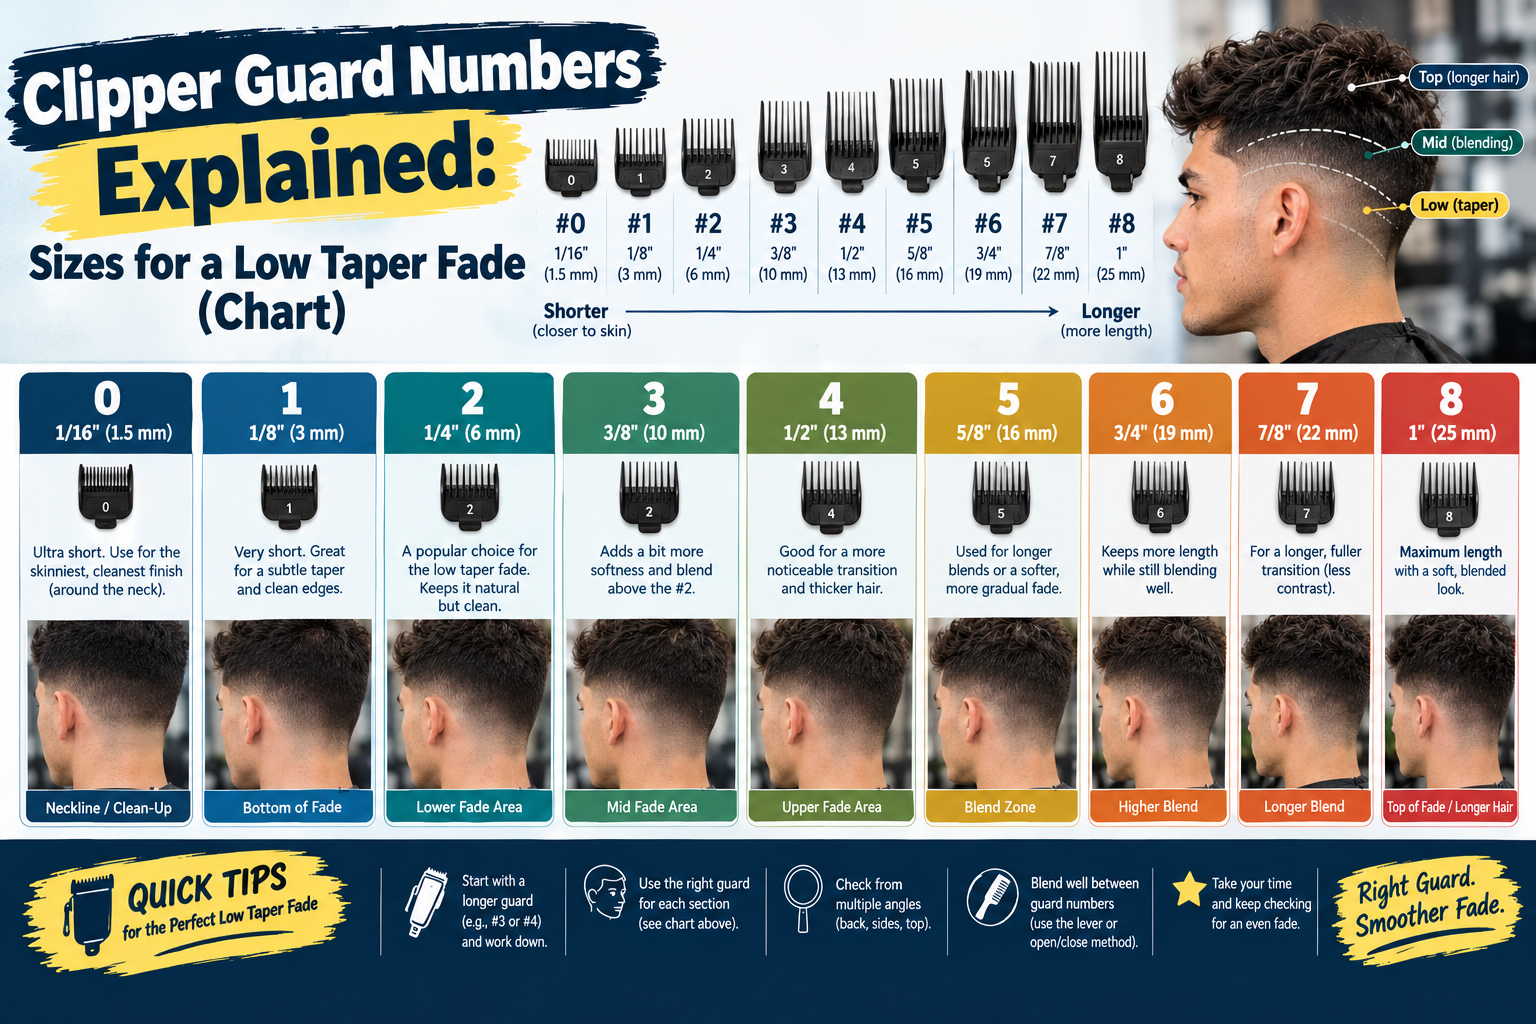
If you are not sure which guard numbers mean what, read our clipper guard numbers guide first.
Before You Start
- Cut dry, clean hair. Clippers glide better on dry hair, and you can see the true length.
- Decide your fade height. For a low taper, the shortest section ends roughly at the top of the ear and a little lower at the back. Mark it mentally on both sides, using the ear and the bottom of the occipital bone as landmarks.
- Decide how short you want the bottom. First time? Do not go to skin. Use a #0.5 or #1 at the bottom. You can always go shorter next time.
- Clip the top out of the way so you only work on the sides and back.
Step 1: Set the Base Length on the Sides
Put on a #3 or #4 guard (whatever length you want on the sides above the taper). Run it over the sides and back, moving upward against the direction of growth, and stop at the point where the head starts to curve toward the top. This creates an even "canvas" for the taper.
Step 2: Create the First Guide Line
Switch to a #2 guard. Starting at the very bottom of the hairline, move the clipper up and flick outward (a gentle scooping motion) when you reach about 1.5 to 2 cm (roughly three quarters of an inch) above the top of the ear. Go all the way around the head at that same height.
The flick is important. If you drag the clipper straight up and pull it away, you leave a hard line. If you scoop out, the hair length tapers naturally.
Step 3: Go Shorter, Lower
Switch to a #1 guard. Repeat the same motion, but flick out about 1 cm lower than your previous line. Then use the #0.5 guard (or the #1 with the lever open, then closed) and flick out another centimetre lower, close to the top of the ear and the lower part of the nape.
For a low taper, each step should be compact. You are working within a small band, roughly the height of your ear.
Step 4: Blend the Lines
At this point you can probably see faint lines between each length. This is normal. To blend:
- Take the guard you used for the upper of two lines.
- Open the clipper lever fully.
- Work only on the line itself with short flicking strokes.
- Close the lever halfway and repeat slightly lower.
Repeat this for each line. Brush away loose hair often and check in good light. Blending is where most of your time should go.
Step 5: The Bottom Edge
With your trimmer (or the bare clipper blade, no guard), clean up the very bottom: the sideburns and the neckline. For a low taper fade, this zone is small, usually the bottom 5 to 10 mm.
- Sideburns: decide on length (usually mid-ear or slightly higher) and trim them straight and even on both sides. Check symmetry in the mirror.
- Around the ears: fold the ear gently and trim a clean curve.
- Neckline: a tapered neckline is easiest at home. Simply fade the bottom hair to nothing rather than cutting a hard line.
Step 6: Connect the Sides to the Top
Unclip the top. Comb the top hair down over the sides. Using scissors (or a longer guard if your top is short), trim any long hair that hangs below the area where the side length begins. This connects the top to the sides so there is no awkward shelf.
If your top is longer, you can leave it disconnected on purpose, but trim it to the style you want: see our guides to the textured crop and French crop for top-cutting ideas.
Step 7: Final Check
- Look at both sides from the front. Are the fade lines at the same height?
- Use the second mirror for the back. Is the neckline even?
- Run your hand up the fade. You should feel a smooth gradient, no steps.
- Rinse and dry. Wet hair often reveals spots you missed.
The Guard Sequence in One Table
| Section | Guard | Where to stop |
|---|---|---|
| Sides base | #3 or #4 | Just below the curve of the head |
| Guide line 1 | #2 | About 1.5–2 cm above the top of the ear |
| Guide line 2 | #1 | About 1 cm lower |
| Guide line 3 | #0.5 or #1 closed | Near the top of the ear and lower nape |
| Edge | Trimmer or bare blade | Bottom 5–10 mm only |
Common Home-Fade Mistakes
Going too high. Every pass creeps upward unless you are careful. Keep your elbow down and check the ear landmark every time.
Pressing too hard. Let the guard rest on the scalp. Pressing in removes more hair than the guard number promises.
Skipping the blend. People rush to the edges because it is satisfying. The blend is what makes a fade look professional.
Uneven sideburns. Look straight ahead, not turned, when checking them.
Going to skin on the first try. Skin exposes every mistake. Stay at #0.5 until you are confident.
How to Fix Common Problems
- A visible line: go over it with the higher guard with the lever open, flicking outward. Then repeat with the lever half-closed.
- A patch that is too short: do not chase it. Blend everything else around it to a slightly longer length, or wait a few days.
- One side higher than the other: bring the lower side up to match only if the difference is small. If it is large, it is better to wait a week and go to a barber.
When to See a Barber Instead
If you want a skin fade, a line-up, a design or a very tight blend on straight hair, a barber will do it better and faster. Many people get a professional cut every six weeks and use home trims to stretch it, which is a great compromise.
Frequently Asked Questions
Can I cut a low taper fade on myself without help?
Yes, but it takes practice. Use two mirrors, go slowly, and start with longer guards. The back is the hardest part; a friend helps a lot on the first few attempts.
Which clippers are best for a home fade?
Look for clippers with an adjustable lever, a sharp stainless or ceramic blade, and a full set of guards including half sizes. A separate trimmer makes the edges easier.
How long does it take to cut a low taper fade at home?
Expect 45 to 60 minutes the first time. With practice, 20 to 30 minutes is realistic.
Should I cut my fade wet or dry?
Dry. Wet hair clumps and clippers pull, and you cannot see the true length.
How often can I touch up my fade at home?
Every 1 to 2 weeks for the edges. Just clean the neckline and sideburns with the trimmer and refresh the bottom guard. See our maintenance guide.